Preparing a trading robot for distribution: from strategy to user package in XTester
Turn a checked strategy version into a complete handoff: user settings, a platform-specific archive, first-launch instructions and clear limits on what was tested.
Your strategy compiles and completes a historical test on your computer. Now you want to give it to someone who has never opened the project and has no idea which settings you changed yesterday. What should you send? How should they start it? And how do you know the archive contains the version you actually checked?
XTester Studio provides an Own Launcher (White Label)… wizard for this job. It builds a standalone Launcher application containing the strategy, the required execution environment and your branding. The recipient opens an application for that particular robot. They do not need the Studio editor for normal use.
This guide covers the work around that build: choosing a version, deciding which settings users may change, checking the archive and explaining the first launch. Product details come from the XTester packaging guide for 1.0.0-preview.1, marked “Reviewed: 2026-11-04”. The capabilities described here were checked against the documentation. We did not build or run a specific robot for this article.
1. Choose the version you intend to share
Suppose you have one strategy and want to give it to a colleague to try. Start with one target computer and one configuration. It is easier to discover what the recipient needs before promising support for several operating systems.
Save the source, compile it and run a historical backtest before opening the wizard. Check the instrument, timeframe, parameters, initial funds and profile. Packaging does not assess the quality of the trading idea.
Keep a short record of the version:
- the rules implemented and the files that contain them;
- the data and period used for the test;
- the parameters, costs and simulation assumptions;
- known limitations and checks still outstanding.
The author prepares this record. The wizard cannot infer the history of your decisions from a project name.
If you first need to check the installation itself, XTester provides a First Check backtest example. The code processes bars and writes log messages without submitting orders. It can help check startup and data handling. Your own robot's trading rules need separate testing.
Open the packaging wizard for the intended strategy folder and check the project shown. The wizard captures a project snapshot; changes during preparation can require reopening it. After editing the code, deliberately start a new build rather than leaving yourself unsure which revision reached the recipient.
2. Decide which settings belong to the user
You can include selected launch profiles and choose a default from that set. Instruments, timeframes and parameters support three policies:
| Policy | What the recipient can do |
|---|---|
| Fixed | Use the value set by the developer |
| Choice | Select from an allowed list |
| Editable | Change the value, within declared limits where provided |
If you have only tested the strategy on one instrument, keep that instrument fixed. Before allowing another timeframe, check how the code behaves with it and explain the scope of the test. Adding a value to a list says nothing about the quality of the result.
You also decide whether recipients may create their own profiles. More freedom calls for a clearer description of the configurations you support. A lock beside a field explains an interface restriction; it does not replace that description.
These setting policies do not make the strategy code private. The current package format includes the strategy source.
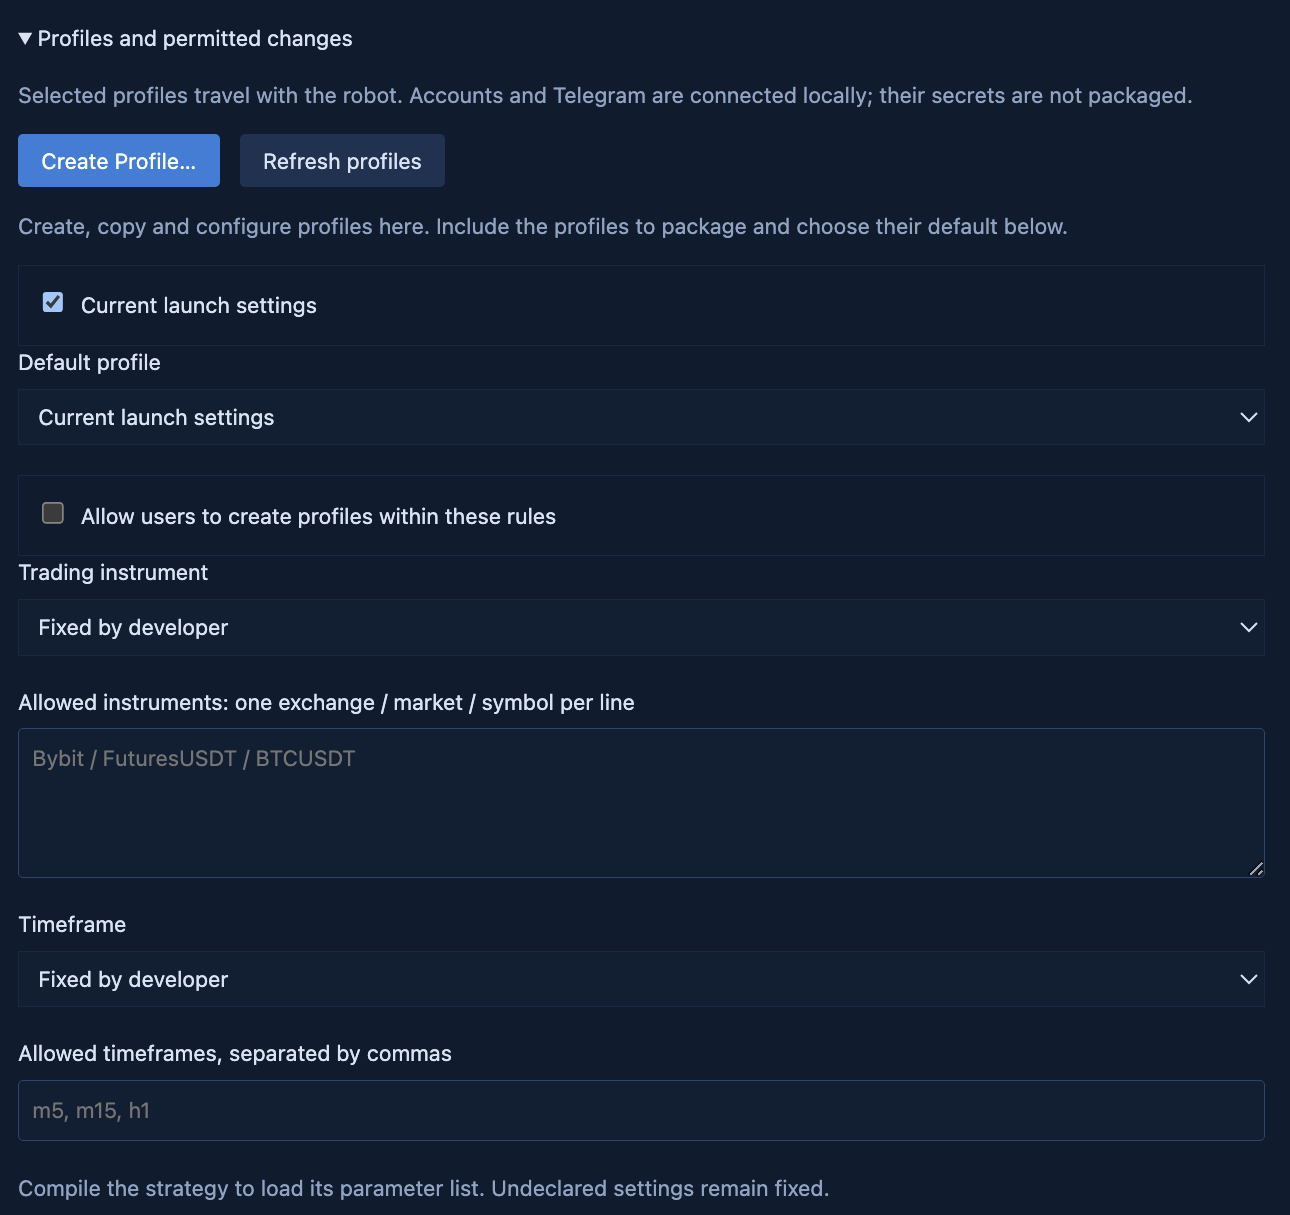
The wizard selects included profiles and controls which values recipients may change. Screenshot from the XTester 1.0.0-preview.1 guide. Detail; the original is included in the review files. Source.
3. Set the branding and review what you are sharing
Give the robot a name, a version, developer details, a logo and an HTTPS support URL. Give the robot its own version number, separate from the Studio release. It should let you and the recipient identify the same set of code and settings.
Review the source and additional files before building. They may contain a hard-coded key, a service address or other information you did not intend to distribute. Secrets held in secure storage do not become credentials for the recipient. That does not hide a secret the author has written into a plain-text file included in the package.
White Label changes the application's presentation. It does not automatically add licensing enforcement, closed-source protection or a trusted publisher signature. The Developer field only sets the displayed name. A publisher certificate is obtained separately.
There is also a specific branding limit on macOS: according to the current guide, the .app icon shown by macOS remains XTester's, although the application name and details change. Check the logo inside the window separately from the icon shown by the operating system.
4. Inspect each platform's build result
Selecting an operating system and architecture requests a build. Each target needs a complete, compatible Launcher template. A successful result on one platform does not establish that another platform is ready.
After the build, read build-report.json. It records the actual paths and the outcome for each target. An overall progress indicator cannot tell you that every target succeeded.
Windows output includes a ZIP archive; macOS and Linux use TAR.GZ. Send the complete archive or the full application directory. The robot needs its resources and execution environment alongside it. A single EXE or strategy file is insufficient. Preserve the .app contents, structure and file permissions on macOS; Linux also needs its executables and launch script.
Next, check the actual archive you plan to send on the matching operating system and architecture. Extracting it into a separate location can help you follow the recipient's path without relying on your usual development folder.
Build success and operating-system trust need separate checks. A renamed macOS application, for example, requires a valid new signature. Do not promise a warning-free launch because the wizard finished successfully. Checking the packaging does not require real trading.
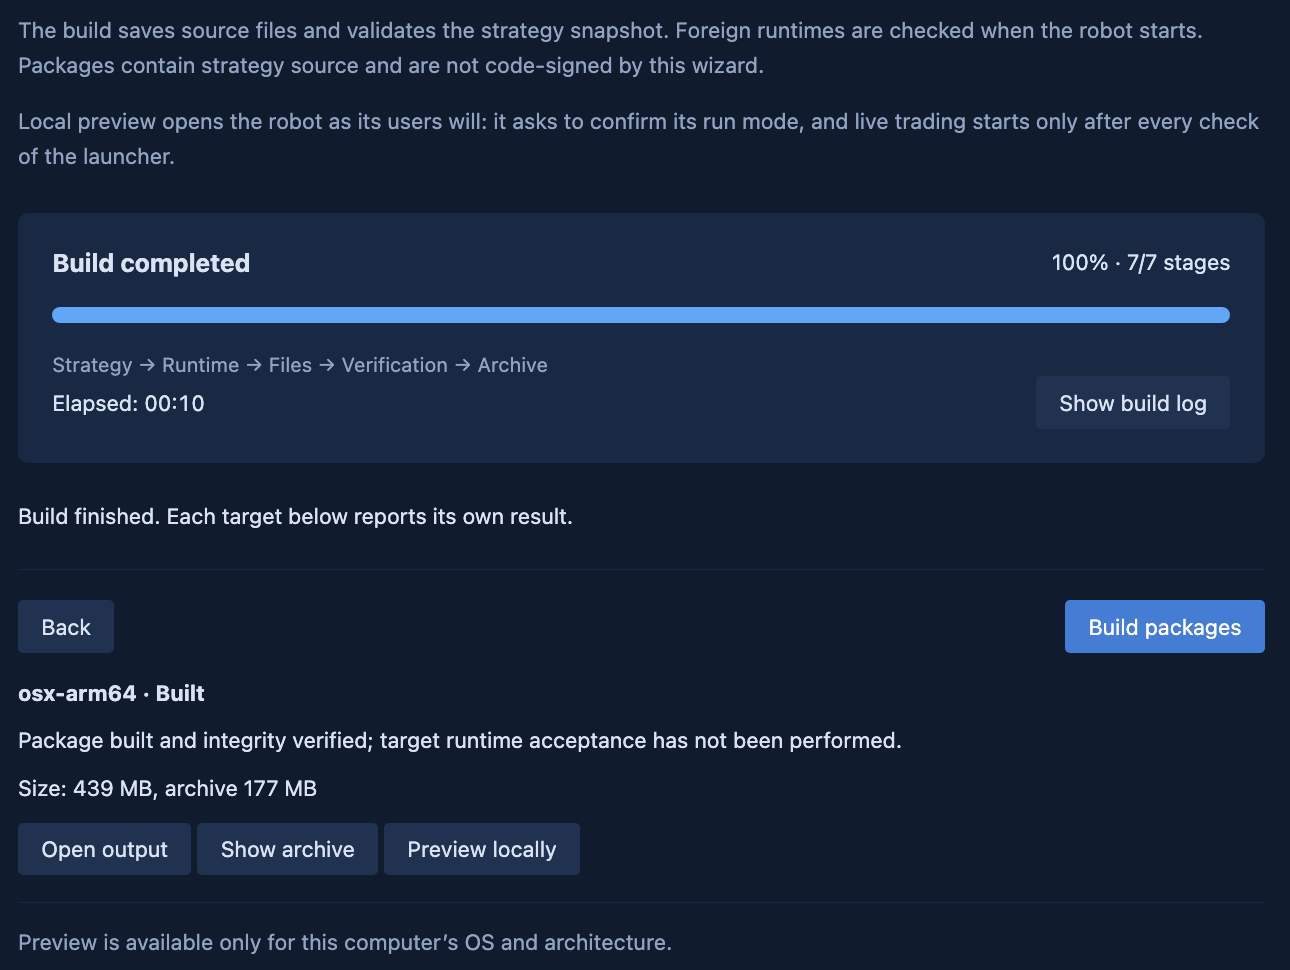
An example robot build result from the XTester guide. Checking startup on the target system is a separate step. Detail; the original is included in the review files. Source.
5. Follow the recipient's first launch
When the application first opens, it checks the package and prepares a working project copy in user storage. If supported tools or libraries are missing, it lists them and requests permission to install them. Restoring dependencies may require internet access and a configured system package manager.
Declining the installation or closing the prompt stops preparation. It is not a successful launch. Your instructions should help the recipient distinguish extracting the archive from preparing the environment.
Preparation is followed by the normal Launcher flow, including mode confirmation. Paper uses a virtual account and public market data, so it still needs an available data source. LIVE requires the recipient's own suitable connection and separate checks of credentials, the account and whether live trading is permitted. The first-launch guide describes that process.
A completed package does not establish that the strategy is ready for a real account. A successful first launch does not prove future returns or reliable execution either.
6. Include a short handoff note
The recipient should be able to tell what they received and where to start without reconstructing your development process. We suggest preparing this note yourself:
| Include | The question it answers |
|---|---|
| Robot name and version | Which release do I have? |
| Operating system and architecture | Is this archive intended for my computer? |
| Extraction and launch instructions | What do I open after downloading it? |
| Required components and data | What might preparation need? |
| Default profile and permitted changes | Which settings do I start with, and what may I change? |
| Test conditions and scope | What did the author actually test? |
| Known limitations and support contact | What is not promised, and where can I ask for help? |
Its contents depend on your project and the checks you performed.
Keep a copy of the archive you sent, the version record and the build report. If the recipient encounters a problem, ask for the robot version, operating system, architecture, exact error and the stage at which it occurred: extraction, dependency preparation or mode selection. Keep build-report.json available for build-related troubleshooting. These details give you a useful starting point instead of a conversation built around “it won't launch.”
7. Treat an update as another handoff
After changing the code, recheck profiles, dependencies and the historical result, then build and check the new package. Tell the recipient what changed and which checks you repeated.
Do not assume that a separately renamed application will automatically be recognised as an update to the previous robot. Retaining package identity matters. Renaming the application does not change the connections or limits of the shared exchange account.
The robot packaging guide covers the detailed interface steps and platform-specific limits. Start with one recipient and check the full handoff using your own strategy.
This article concerns preparing an application for distribution. It is not investment advice. Historical tests, Paper runs and successful builds do not guarantee profit or rule out losses in real trading.